ab solutely loving my life blogspot

  • Subscribe to our RSS feed.
  • Twitter
  • StumbleUpon
  • Reddit
  • Facebook
  • Digg

Thursday, 26 January 2012

DIY Canisters from Recycled Holiday Tins

Posted on 14:00 by gayle


I mentioned in my last post (Labeling Glass Canisters) that I had a DIY canister project I wanted to share with you.  Well, here it is.  After several years of using small, glass Ikea canisters for my baking needs, I've moved on to these large, repurposed canisters….and it only cost me $10 to do it:)

I was inspired by these canisters that I saw at Hobby Lobby.  In need of the large canisters, I priced them only to discover they were $15 a piece.  I needed eight canisters for the following items: flour, sugar, brown sugar, powdered sugar, stevia, tea, coffee and hot chocolate.  I really didn't want to spend one hundred-plus dollars on canisters, so I decided that I was just gonna have to get creative.


Here's what my canisters  looked like before their makeover.  I recently found these holiday tins at Hobby Lobby, and the best part is that they were clearanced at 90% off.  While these tins met my storage needs, the festive decorations on them....well, not so much.  To fix that little problem,  I got my craft on and spruced them up a bit.

These are the way my canisters turned out after they received their makeover.   Obviously my version of these canisters is not dishwasher safe.  Since they are only holding flour and sugar, a quick wipe down of the inside of the canisters is sufficient when they need to be cleaned.  Supplies needed for this project are as follows: recycled tins, paper, Mod Podge, letters, and spray paint.  Here's how I gave eight holiday tins a practical makeover.

First, I took off all of the lids off and painted the tops of them only.  I did not paint the bottom of the lids for obvious reasons.

While the lids were drying, I began to transform the outside of the tins with paper and Mod Podge.  I measured my paper to fit each container.  It took two pieces of scrapbook paper to fit around one container.

Once the paper was ready to be assembled, I brushed a layer of Mod Podge onto one half of the container.

Then, I placed one of my pieces of paper onto the glued surface.  Once the first piece was secure, I Mod Podged the other side and applied the second piece of paper.

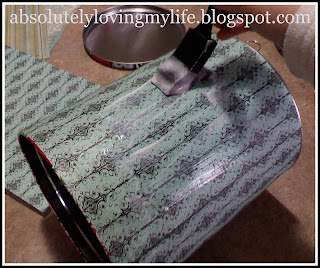
Here's a helpful tip when working with Mod Podge.  To avoid those pesky bumps, air bubbles and wrinkles that tend to form as the Mod Podge dries, use some sort of flat tool to even them out before they dry.  I use my pizza scraper, and it does wonders.  And since the pizza scraper is  only being used on the paper, not the glue, there isn't any crafting damage done to my kitchen tool.  Multi-purpose, now that's what I'm talkin' about;)

Once the paper has been applied around the perimeter of the container, a second layer of Mod Podge needs to be applied to the paper to give  a sealed, finished look to the containers.

After my containers were dry, I decided that I wanted to make labels for each container.  To do this, I simply used Word.  I printed out my labels and cut out each individual letter for the canisters.  I then applied the letters to the paper using the same Mod Podge technique that I used to apply the paper to the canisters.  Stickers would have saved me a lot of time, but it would have also cost me more money.  My money was worth more than my time, so I chose the tedious way of making labels for this project;) The font that I used was Cooper Black.  I used 120 font size for the larger containers and 100 font size for the smaller ones. 

After I made the five large canisters, I made these three smaller ones for coffee, hot chocolate and tea.  I used the same Mod Podge  methods to make these as I did the other five.   If Mod Podge isn't your thing, recycled tins can receive a simple makeover with a coat of paint and some stickers for labels.   If you can find a pattern that suites your taste, contact paper could even be an alternative for this project. 
 
So that's it!  Recycled and repurposed, these newly revamped canisters represent my style in a practical and inexpensive way.  Does it really get better than that:)

Email ThisBlogThis!Share to XShare to Facebook
Posted in crafts, mod podge, projects | No comments
Newer Post Older Post Home

0 comments:

Post a Comment

Subscribe to: Post Comments (Atom)

Popular Posts

  • Little Boy Bathroom
    Today I’m finishing up my blog series about our twin nursery.  I thought I’d finish things up with a post about the bathroom off the boys’ r...
  • DIY Vintage Insect Wall Art
    Today I want to share a fun project that I made for our guestroom.   I really liked the look of vintage insect art. I know it sounds kind of...
  • My 2011 Book List
    I pretty much always have a book in my bag or in my purse, if not two or three books.  I have yet to get a Kindle or Nook ~ there's just...
  • Parenting Twins - The First Year (Month 3)
     Development: Three months old today!   This month they are showing great head and neck control.  They love to sit up and look around.  The...
  • Mom's Bagel Dip
    This is a great appetizer for any upcoming holiday parties. My mom always makes this recipe for Christmas gatherings, and it’s a bit hit.   ...
  • The First Snow of the Season
                         Yesterday was the first snow of year. It started snowing late in the afternoon when I picked the girls up from school. ...
  • It's A Goodwill Good Deal ~ $1.50 Center Piece
       While at Goodwill, I came across this serving dish for $1.50.  It was marked for $2.99, but it was half off.  I originally went to Goodwi...
  • DIY Little Girl Lamp Shades
    As most of you know, I am a nanny for two girls, ages 5 and 7.   The girls are in the process of getting new décor for their bedrooms, and t...
  • The Vow ~ Book and Movie Review
              Due to today being Valentine’s day, I thought that I would write a post about the popular book and movie, The Vow.    After readi...
  • It's A Goodwill Good Deal - $2 Mod Podge Checkerboard Tray
    When I had my apartment, I found a tray at Goodwill for $2.  I used paint and Mod Podge to turn it into a checkerboard tray to display on my...

Categories

  • 29
  • adoption
  • annie sloans chalk paint
  • anniversary
  • apple orchard
  • autumn
  • awards
  • babies
  • baby
  • banner
  • barstool
  • bathroom
  • beads
  • birth
  • birthday
  • blogging
  • book
  • book pages
  • books
  • bookshelf
  • Boston
  • Brown County
  • buttons
  • California Road Trip
  • candles
  • canisters
  • chair
  • chalk board paint
  • chalk paint
  • chalkboard paint
  • chevron
  • christmas
  • cleaners
  • coffee beans
  • Connecticut
  • conner prairie
  • covered bridge festival
  • craft
  • crafts
  • craigslist
  • crib bumper
  • crib skirt
  • curtains
  • cushion
  • date night
  • day trip
  • decoupage
  • desk
  • DIY
  • Dollar Store
  • door knobs
  • dresser
  • elections
  • fabric
  • fall
  • family
  • featured
  • felt
  • floors
  • flowers
  • food
  • front door
  • front porch
  • furniture
  • giveaways
  • going yellow
  • goo gone
  • goodwill good deal
  • great finds
  • green
  • Halloween
  • headless horseman
  • hiking
  • holidays
  • house
  • husband
  • infertility
  • infertily
  • IUI
  • journal
  • Kennebunkport
  • Kent
  • kitchen
  • lamp
  • lamp shade
  • lamps
  • landscaping
  • letters to my babies
  • Maine
  • marriage
  • Martha's Vineyard
  • Massachussetts
  • maternity pictures
  • Memorial Day
  • mod podge
  • monogram
  • movie
  • movies
  • my job
  • my mom
  • napkin
  • Nashville
  • New England Road Trip
  • new year
  • no-sew
  • nursery
  • one month old
  • organization
  • outdoors
  • paint
  • pantry
  • parenting
  • patriotic
  • photos
  • picnic
  • pillow
  • pregnancy
  • project
  • projects
  • pumpkin patch
  • pumpkins
  • random
  • reading
  • red
  • review
  • rope
  • Safe Haven
  • San Francisco
  • scrapbook paper
  • snow
  • spray paint
  • spring
  • stripes
  • summer
  • table
  • Tennessee
  • three months old
  • tiles
  • TP tubes
  • travel
  • Turkey Run State Park
  • turning 30
  • twins
  • two months old
  • upcycled
  • vacation
  • Valentine
  • vote
  • wall decor
  • wall treatment
  • weekend getaway
  • winter
  • wreath
  • yard sale find

Blog Archive

  • ►  2014 (36)
    • ►  July (21)
    • ►  June (3)
    • ►  May (1)
    • ►  April (4)
    • ►  March (2)
    • ►  February (4)
    • ►  January (1)
  • ►  2013 (45)
    • ►  December (3)
    • ►  November (2)
    • ►  October (5)
    • ►  September (1)
    • ►  August (3)
    • ►  July (1)
    • ►  May (3)
    • ►  April (13)
    • ►  March (7)
    • ►  February (6)
    • ►  January (1)
  • ▼  2012 (89)
    • ►  November (3)
    • ►  October (7)
    • ►  September (3)
    • ►  August (12)
    • ►  July (9)
    • ►  June (7)
    • ►  May (7)
    • ►  April (11)
    • ►  March (11)
    • ►  February (10)
    • ▼  January (9)
      • Downtown Indy during the Super Bowl
      • DIY Canisters from Recycled Holiday Tins
      • Labeling Glass Canisters
      • Mod Podge Laundry Room Sign
      • Home: A Place to Unwind
      • Ribbon Lampshade and Spray Painted Goodwill Lamp
      • Worth It All.....
      • A Quick Update....
      • I Can Only Wish.....
  • ►  2011 (165)
    • ►  December (18)
    • ►  November (11)
    • ►  October (19)
    • ►  September (12)
    • ►  August (20)
    • ►  July (19)
    • ►  June (19)
    • ►  May (17)
    • ►  April (12)
    • ►  March (10)
    • ►  February (8)
Powered by Blogger.

About Me

gayle
View my complete profile